 |
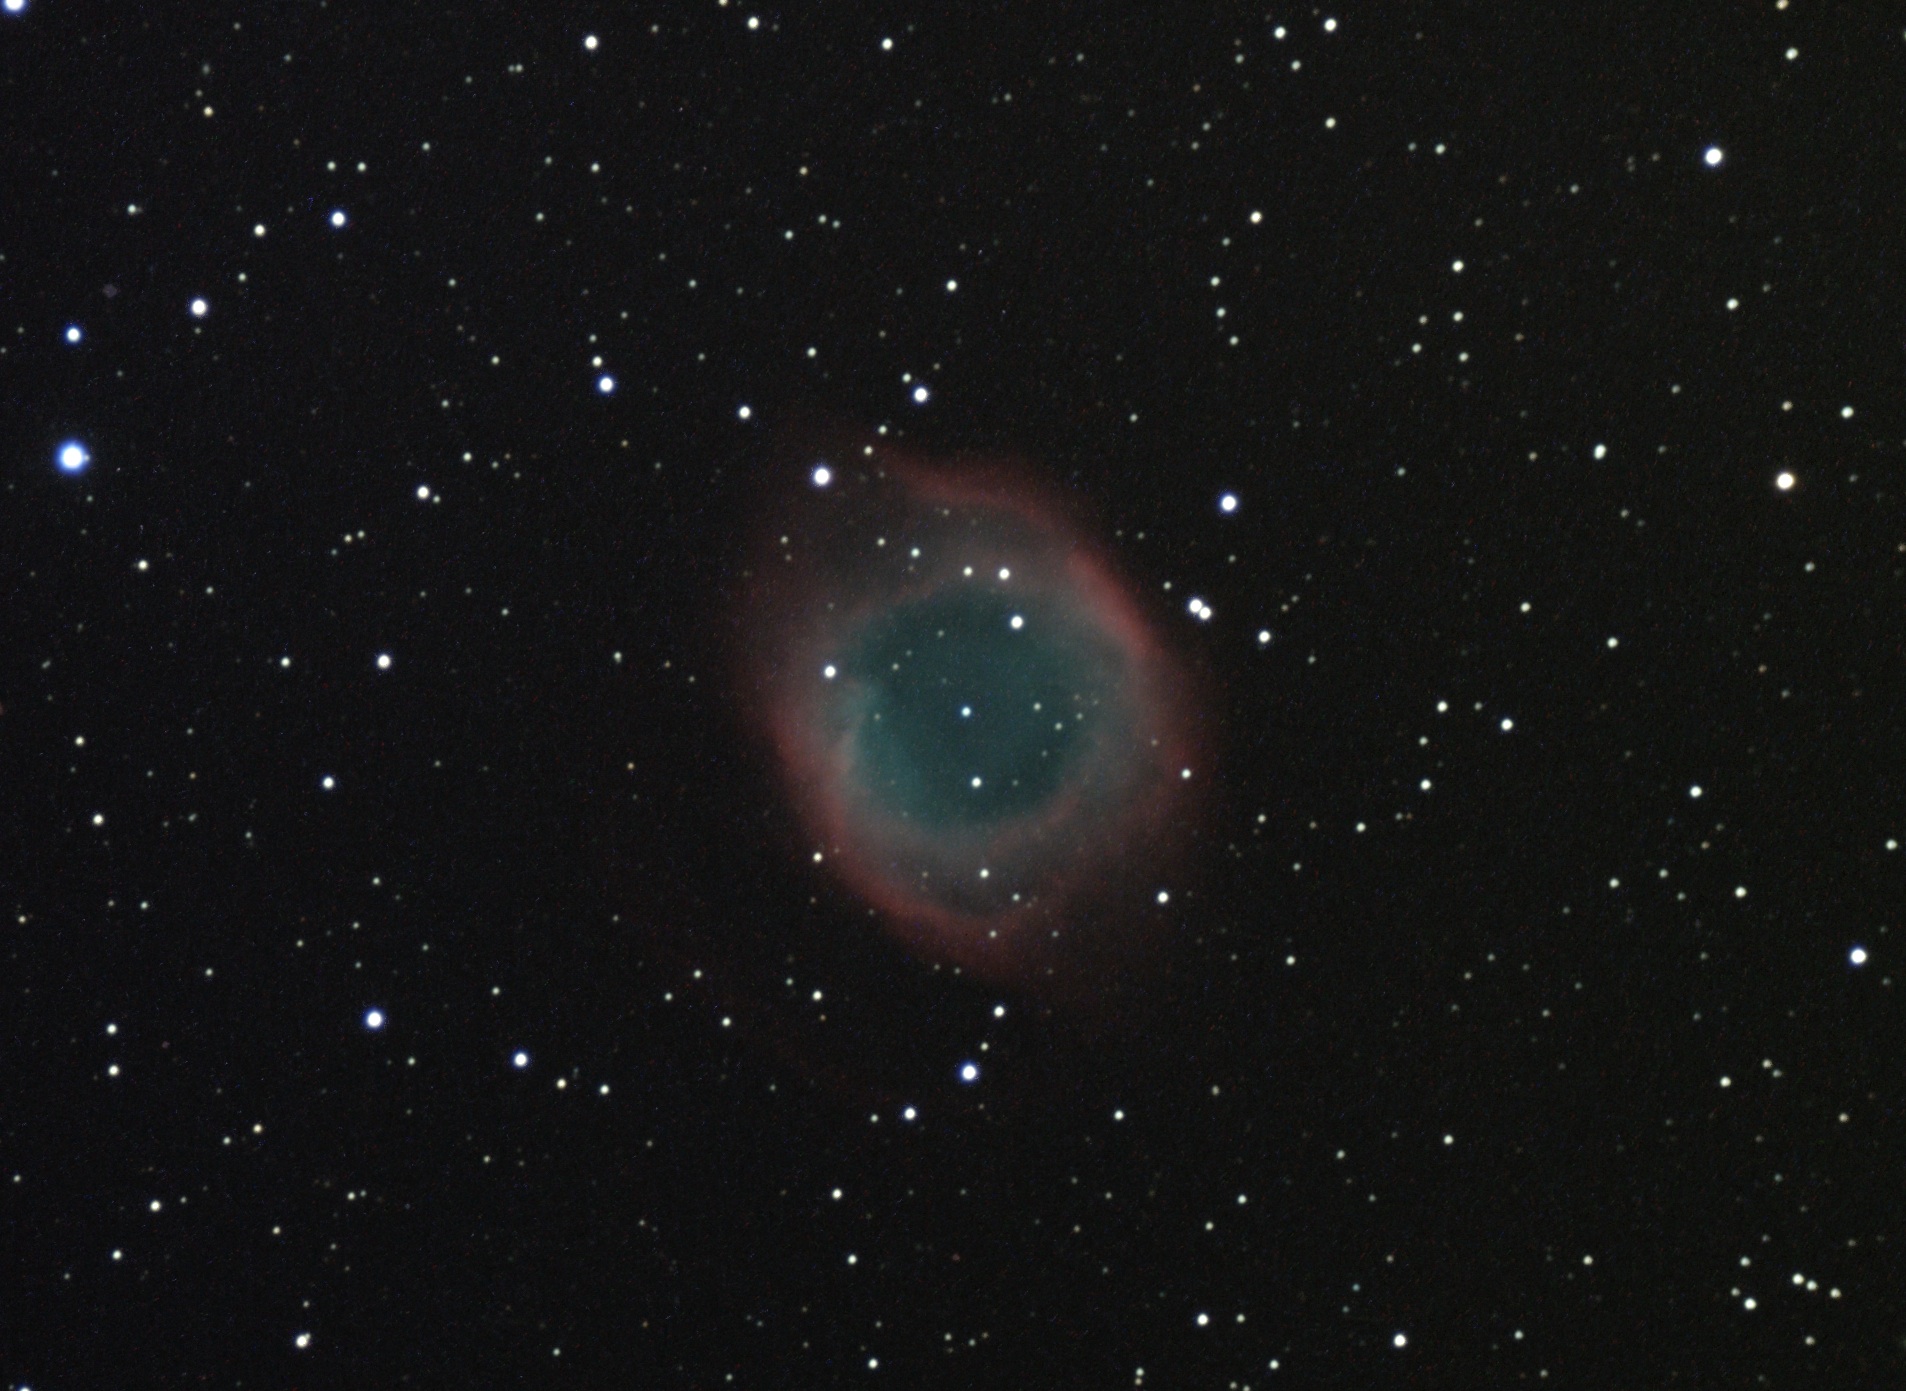
33. NGC 7293 Helix planetary nebula
Notes: The Helix is a very near neighbor in our own galaxy, which is 150,000 light years in diameter. The colors in our image have not been altered. A page from the Australian Astronomical Observatory states "The greenish middle portion is evidence of excited oxygen atoms, while the outer red is predominantly light from nitrogen and hydrogen. The smallest of the radial blobs inside the red shell are about 150 astronomical units across (150 times the Earth-Sun distance)." We can see the blobs most clearly in the lower right, inside the shell. The "blobs" apparently consist of filaments blown away from the central dying star. The filament structure can also be seen in this image. More information on the process can be found at the site of Jim Kaler, who says that the nebula has a barrel shape, "wherein we look down the barrel's mouth". An image created by NASA from 58 hours of exposure maybe be the most revealing. The central star burns very hot, which accounts for it's barely discernable bluish hue.
Technical notes: The image combines sets from five nights for a total of 10 hours and 40 min. With 40 subexposures the image was very grainy. With 64, it is still grainy, but less so. We think it would have helped to use a filter to cut out the light pollution coming from Sacramento and Auburn, but we had returned ours for replacement, as the original had the wrong thread, not the 48mm .75 pitch we ordered. It is interesting to compare our image with one taken with a 130mm triplet apochromatic reflector and a Canon 550Da DSLR by Jerry Lodriguess. Lodriguess stacked only 17 subexposures of 10 min each at ISO 1600 for the image. The Lodriguess image has been enhanced in Photoshop.
NGC 7293 sits a handspan above and slightly west of the bright star Formalhaut in the southern sky. From our normal set up position in the yard, the field of view is obscured to the south by pine trees and the house. For some time we have wondered whether we could obtain a polar alignment, or some kind of working alignment, if we set up on the back deck, where the house would obscure our view of Polaris. Browsing the internet failed to turn up an useful procedure. Nevertheless, the subexposures for this image of NGC 7293 were shot from our south deck. Alignment proved to be no problem at all. We set the mount in the direction that we judged to point to Polaris and we started the two-star alignment process in the NexRemote program that comes with the CGEM. We simply clicked Enter on all settings until the program presented us with Vega as a guide star. We clicked Enter. The telescope slewed to a position directed somewhat to the North (rightwards) and West (downwards) of Vega. We physically shifted the mount westward by lifting the eastward two legs and moving them counter-clockwise around the west leg until the alignment was improved. This would work best with two people, but it was done by one. Then we used the alt-azimuth knobs to further improve the alignment and shifted the mount a bit more by moving the legs. Finally, we recentered the bubble on the mount and we used the directional buttons in NexRemote to center Vega in PhD Guiding. Our second guide star was Altair, which was close to the meridian, but we used it anyway. We were able to align on Altair using only NexRemote. The alignment improved as we added calibration stars Scheat, Alpheratz, and Formalhaut.
The alignment appeared to be nearly as good as those we obtained with polar alignment from our normal location with the northerly view. By the second calibration star, we were hitting very close to the bullseye in the PHD screen. Guiding also appeared to be as true and stable as any of our previous efforts. The same procedure worked four nights later after the equipment had been broken down and reassembled. (Broken down for a cruel practical joke when Alan and Evan used a realistic looking dummy assembly to make it appear that Alan had stumbled into the mount and knocked mount and scope over the 16 foot drop off the deck. As all of this took place within sight and hearing of Gary, the dummy landed with a sickening thud. Alan and Evan are not cruel persons by any measure, but it must be said that they opened the door just a crack to questions of judgement.) We conclude that the emphasis on precise polar alignment that we see so frequently in forum discussions is unwarranted. The guiding program smoothes out small errors in alignment.
With so many images acquired over several days, stacking becomes more difficult. The images from each night are slightly offset from the previous night, especially if the mount has been moved and the scope realigned, as occurred in this instance. As the alignment program presents a sequence of subexposures, it takes some concentration to choose and follow identifiable reference stars. It is also easy to form a habit of executing Command-click and then accidentally repeating it after a frame shift, which requires aborting the whole alignment and starting over. When an image shifts, one must locate and reselect the same reference star. We had to abort and begin again several times. In processing with Nebulosity, we ran one set with drizzle alignment, which produced a mat effect. The image was a bit brighter, but definition was not improved, so we finally chose the default alignment with averaging. Zoom in/out with ⌘↑(+/-) (Mac), ctrl (+/-) (PC).